Why You'll Love It
- - No oven needed, perfect for hot summers
- - Creamy texture with a gentle crunch
- - Simple ingredients that most already have
- - Stunning presentation with minimal effort
*"The Oreo poke cake reminded me of childhood birthday parties – just pure comfort in every bite."*
Essential Ingredient Guide
- Oreo cookies: Choose the classic chocolate‑creme variety for authentic flavor and crumbly texture.
- Instant vanilla pudding mix: Provides the smooth custard base; whisk with cold milk for best consistency.
- Milk: Whole milk adds richness; you can substitute almond for a lighter touch.
- Butter: Melted butter greases the pan and adds a subtle buttery note to the cake.
- Chocolate frosting: A pre‑made or homemade frosting gives the final glossy coating.
- Oreo crumbs: Sprinkle on top for extra crunch and visual appeal.

Complete Cooking Process
-
Ingredient Readiness:
Gather all cookies, crush half for the base, and set the remaining whole for garnish. Mix pudding with milk while the cake cools.
-
Flavor Development:
Pour the milk‑pudding mixture over the sponge and let the holes soak, allowing the flavors to meld.
-
Texture Control:
After soaking, gently fold in crushed Oreos to keep the cake moist yet airy.
-
Finishing Touches:
Spread chocolate frosting evenly, then scatter Oreo crumbs for that signature look.
-
Serving Timing:
Refrigerate for at least two hours; serve chilled for optimal texture.
- Use a sturdy springform pan to keep the cake intact while poking.
- Pat the crumbs gently so they stick without sinking.
- Chill the frosting slightly before spreading for smoother coverage.
- Taste the milk mixture before pouring; adjust sweetness if needed.
Pro Tips
Honestly, a little patience goes a long way. Let the cake rest, and you’ll notice how the flavors settle in a comforting way. Also, when you’re spreading the frosting, take a moment to appreciate the glossy sheen – it’s part of the experience, not just the finish. So, go ahead, slice a piece, and let the cool, creamy layers melt on your tongue.

The essence of the dish:
A fun fact or historical angle:
Flavor or sensory focus:
You Must Know
- Use chilled milk for a smoother custard
- Don’t over‑poke – two‑thirds depth is enough
- Serve straight from the fridge for best texture
Frequently Asked Questions
→ Can I use gluten‑free cookies?
Yes, substitute with a gluten‑free chocolate cookie that has a similar texture.
→ How long can I store the cake?
Keep it refrigerated in an airtight container for up to three days.
→ Can I add fresh fruit?
Fresh berries work nicely on top, just add them just before serving to avoid sogginess.
→ Do I need to bake the base?
No baking required; a store‑bought vanilla sponge or even a simple cake mix works.
→ What if I don’t have pudding mix?
You can whisk together instant vanilla flavor powder with milk and a pinch of cornstarch as a substitute.
→ Is this recipe kid‑friendly?
Absolutely – it’s sweet, soft, and fun to eat, making it perfect for little hands.
Chef's Tips
If the cake seems dry, add a little more milk before frosting.,For extra sparkle, drizzle a thin ribbon of chocolate ganache just before serving.,You can prepare the pudding mixture a day ahead; keep it refrigerated.
Nutrition Facts
per serving
420
Calories
5g
Protein
48g
Carbs
22g
Fat
Taste Profile
Rich chocolate‑Oreo sweetness with creamy undertones
Ingredient Substitutions
Don't have an ingredient? Try these alternatives
Will alter the flavor slightly but keep the crunch.
Provides a milder taste, perfect for those who prefer less cocoa.
Recipe Variations
Try these delicious twists on the original
Spicy Version
Add a pinch of cayenne pepper to the pudding mixture for a subtle heat.
Mediterranean Style
Swap chocolate frosting for a light cream cheese glaze and sprinkle toasted pistachios on top.
Common Mistakes to Avoid
Learn from others' mistakes for perfect results
- Over‑poking the cake, which can cause it to collapse.
- Using warm milk, which prevents the pudding from setting properly.
- Applying frosting while the cake is still warm, leading to a soggy finish.
Meal Prep & Storage
Make Ahead Tips
You can assemble the cake up to a day ahead; keep it refrigerated and add the frosting just before serving.
Leftover Ideas
Reheat gently in the microwave for 10‑15 seconds if you prefer a warmer texture, but the cake is best cold.
Perfect Pairings
Serve this with...
Cooking Timeline
Gather and measure all ingredients; crush Oreos.
Mix pudding with milk; let set.
Prepare cake base, poke holes, and pour pudding mixture.
Allow cake to absorb liquid, then spread frosting.
Add Oreo crumbs and garnish; refrigerate.
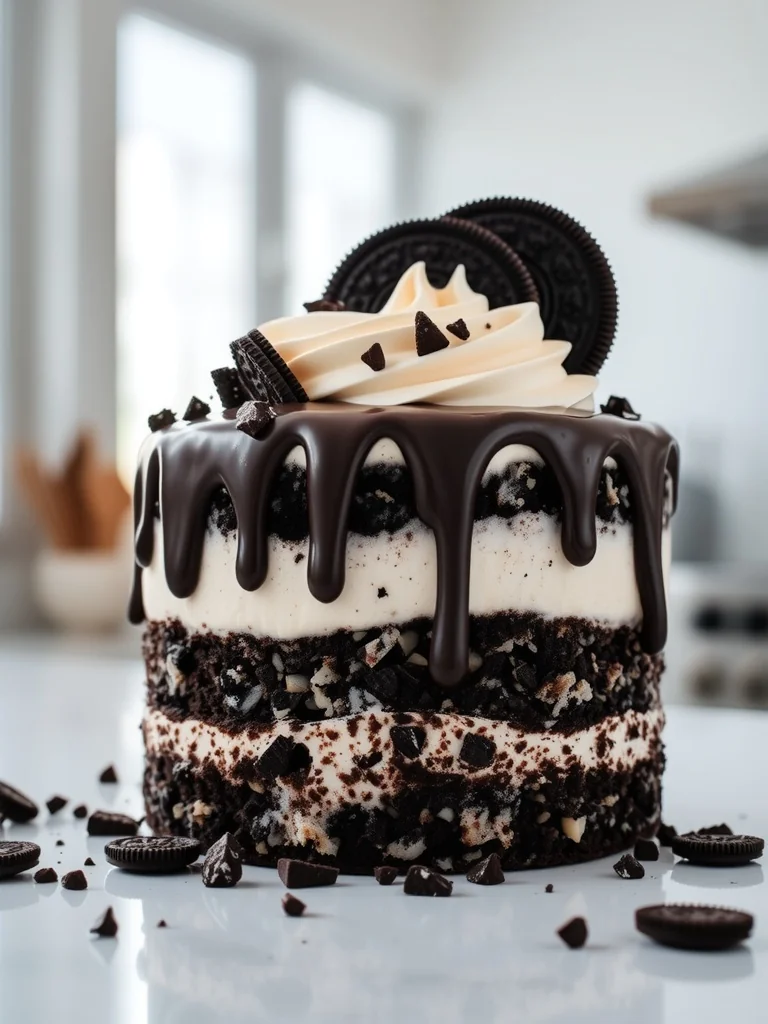
Oreo Poke Cake – Easy No‑Bake Dessert
A luscious no‑bake treat that layers creamy Oreo‑infused custard with a soft vanilla sponge, finished with chocolate frosting and crunchy Oreo crumbs.
Timing
Prep Time
15 Minutes
Cook Time
0 Minutes
Total Time
2 Hours 15 Minutes
Recipe Details
Ingredients
Base and Soak
- 01 1 (9‑inch) vanilla sponge cake, cut into layers
- 02 2 cups whole milk, chilled
- 03 1 packet (3.4 oz) instant vanilla pudding mix
- 04 12 Oreo cookies, crushed
- 05 4 tbsp unsalted butter, melted
Frosting and Garnish
- 01 1 cup chocolate frosting
- 02 6 whole Oreo cookies, halved
- 03 2 tbsp Oreo crumbs
Instructions
Place the sponge cake in a springform pan, brush the melted butter over top, and set aside.
In a bowl, whisk the pudding mix with the chilled milk until smooth; let it sit for 2 minutes.
Using a sturdy spoon, poke holes about two‑thirds deep across the cake surface.
Pour the pudding‑milk mixture over the cake, allowing it to seep into the holes; spoon crushed Oreo cookies over the top and let the cake rest for 30 minutes.
Spread the chocolate frosting evenly over the chilled cake, smoothing with an offset spatula.
Arrange halved Oreo cookies on top, then sprinkle Oreo crumbs for added crunch.
Refrigerate the assembled cake for at least 1½ hours before slicing.
Notes & Tips
- 1 If the cake seems dry, add a little more milk before frosting.
- 2 For extra sparkle, drizzle a thin ribbon of chocolate ganache just before serving.
- 3 You can prepare the pudding mixture a day ahead; keep it refrigerated.
Tools You'll Need
-
Springform pan
-
Large mixing bowl
-
Whisk
-
Spoon for poking
-
Offset spatula
-
Measuring cups and spoons
Must-Know Tips
- Don’t over‑poke – too many holes can make the cake fall apart.
- Let the cake rest after adding the milk mixture to fully absorb flavors.
- Spread frosting while the cake is still slightly cool for easier handling.
Professional Secrets
- Use cold milk for a firmer custard that holds its shape.
- Chill the butter before brushing to prevent soggy bases.
- Apply frosting in thin layers to avoid crushing the soaked cake.

Recipe by
Valentina MorettiChef Valentina Moretti developed her passion for baking while growing up near traditional European bakeries. She focuses on classic pastries like croi ...
Get Delicious Recipes Weekly
Join 25,000+ home cooks getting our best recipes straight to their inbox.
Free forever • No spam • Unsubscribe anytime