Why You'll Love It
- - No oven required, so your kitchen stays cool.
- - Quick set time – ready in under 15 minutes.
- - Individual portions perfect for parties or snacking.
- - Light, citrusy flavor that feels refreshing.
*“These mini pies are a delightful surprise – tangy, smooth, and just the right size for a sweet pause.”*
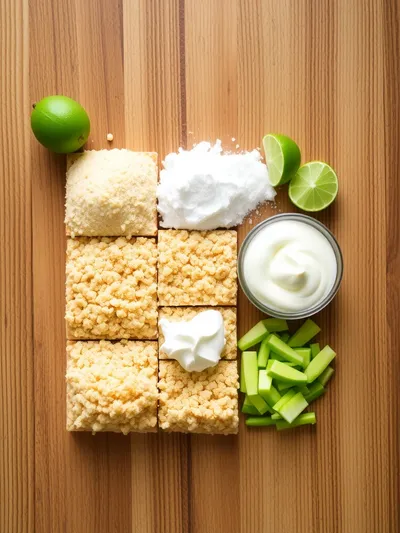
Essential Ingredient Guide
- Key lime juice: Freshly squeezed juice gives the brightest aroma; choose ripe, fragrant limes for maximum zing.
- Sweetened condensed milk: Provides silky sweetness; use the full‑fat version for a richer mouthfeel.
- Graham cracker crumbs: Creates a buttery crust; toast them lightly for extra depth.
- Whipped cream: Adds airy lightness; fold gently to keep the filling airy.
- Lime zest: A pinch of zest brightens the top and adds a subtle texture.
- Sugar (optional): Adjust if you prefer a sweeter balance, especially with very tart limes.
Complete Cooking Process
-
Ingredient Readiness:
Gather all components, squeeze the limes, and crush the crackers while the kitchen fills with citrus perfume.
-
Flavor Development:
Mix the lime juice with condensed milk; the creamy swirl begins to take on that signature tang.
-
Texture Control:
Press the crumb mixture into each tin; ensure an even base that will hold the filling gently.
-
Finishing Touches:
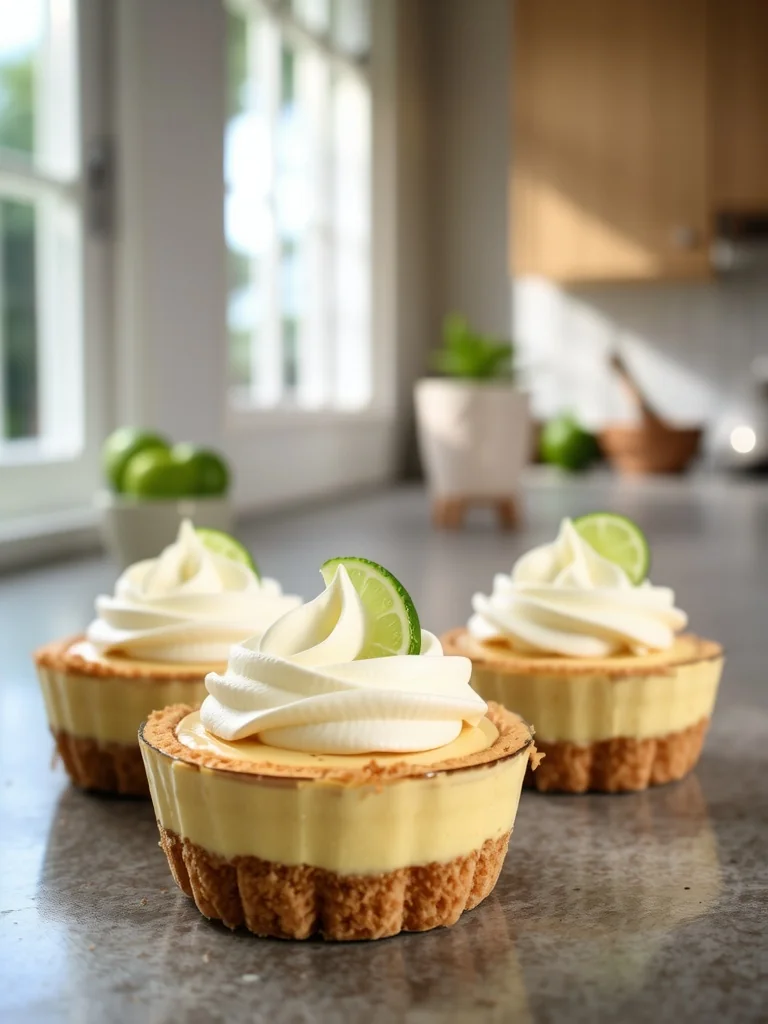
Top each pie with a dollop of whipped cream and a dusting of zest just before serving.
-
Serving Timing:
Let the pies chill for 10‑15 minutes; they set beautifully and are ready to delight any guest.
- Use a mini tart pan or popped‑corked muffin liners for uniform size.
- Chill the crust for 5 minutes before adding filling to prevent sogginess.
- Serve with a thin slice of lime for an extra burst of aroma.
- If the filling seems too thick, whisk in a splash of extra lime juice.
Pro Tips
I find that a little pause while the pies set in the fridge lets the flavors meld, and the kitchen stays calm. So, yeah, let them rest; you’ll be rewarded with a silky texture that holds its shape beautifully. Oh, and don’t forget that gentle tap on the rim of the pan to settle the crust evenly – a tiny habit that makes a big difference.
The essence of the dish:
A fun fact or historical angle:
Flavor or sensory focus:
You Must Know
- Set time is short – no waiting around.
- Portion control is built‑in.
- Citrus can brighten any dessert.
Frequently Asked Questions
→ Can I use bottled lime juice?
Fresh juice gives the brightest flavor, but bottled juice works in a pinch; choose one without added sugars.
→ How do I keep the crust from getting soggy?
Press the crumbs firmly and chill the crust for a few minutes before adding the filling.
→ Can I make these ahead of time?
Absolutely – assemble the pies and refrigerate up to 24 hours; they’ll stay fresh and set perfectly.
→ What if I don’t have graham crackers?
You can substitute digestive biscuits or vanilla wafer crumbs for a similar texture.
→ Are they gluten‑free?
Swap the graham crackers for a gluten‑free crumb blend and you’ll have a safe version.
→ Can I add a garnish?
A thin slice of lime or a sprinkle of toasted coconut adds a lovely touch.
Chef's Tips
If the filling is too runny, add a touch more whipped cream and chill a few minutes longer.,For extra zing, drizzle a thin line of lime curd over the whipped cream.,Store leftovers covered in the fridge; they stay fresh for up to 2 days.
Nutrition Facts
per serving
180
Calories
3g
Protein
24g
Carbs
9g
Fat
Taste Profile
Bright citrus sweetness with buttery undertones
Ingredient Substitutions
Don't have an ingredient? Try these alternatives
Provides a similar buttery flavor; toast lightly for extra depth.
Creates a dairy‑free version with a slight coconut hint.
Recipe Variations
Try these delicious twists on the original
Spicy Version
Add a pinch of cayenne pepper to the filling for a subtle heat that balances the lime.
Mediterranean Style
Stir in crumbled feta and a dash of oregano into the crust for a savory twist.
Common Mistakes to Avoid
Learn from others' mistakes for perfect results
- Over‑mixing the filling, which can make it dense.
- Pressing the crust too lightly, leading to soggy bottoms.
- Using too much lime juice, resulting in an overly sour bite.
Meal Prep & Storage
Make Ahead Tips
You can press the crust and chill it, then whisk the filling and keep it refrigerated; assemble just before serving for ultimate freshness.
Leftover Ideas
Refrigerate remaining pies in a sealed container; enjoy within 2 days, letting them sit at room temperature for a few minutes before eating.
Perfect Pairings
Serve this with...
Cooking Timeline
Prepare crust: combine crumbs, butter, and sugar; press into mini tins.
Whisk lime juice, condensed milk, and zest into a smooth filling.
Fold in whipped cream gently, keeping the mixture light.
Spoon filling into crusts, smooth tops, and chill to set.
Add final garnish of whipped cream and lime zest; serve chilled.
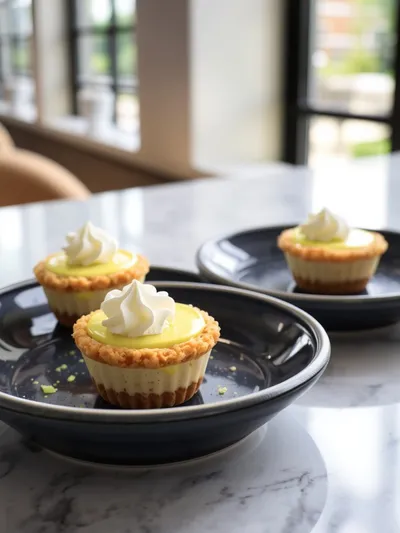
Mini Key Lime Pie – No‑Bake Mini Treat
Bright, tangy mini key lime pies that set in minutes—no oven needed. Perfect for a quick, refreshing dessert that feels like a tiny slice of sunshine.
Timing
Prep Time
10 Minutes
Cook Time
0 Minutes
Total Time
25 Minutes
Recipe Details
Ingredients
Crust
- 01 1 1/2 cups graham cracker crumbs
- 02 3 tbsp unsalted butter, melted
- 03 1 tbsp sugar
Filling
- 01 1 cup sweetened condensed milk
- 02 1/2 cup fresh key lime juice
- 03 Zest of 1 lime
- 04 1/2 cup heavy whipping cream
Instructions
Combine graham cracker crumbs, melted butter, and sugar; press the mixture into the bottoms of 12 mini tart tins, creating an even layer.
In a bowl, whisk together sweetened condensed milk, fresh key lime juice, and lime zest until smooth and slightly thickened.
Fold in whipped cream gently, preserving the airy texture, then spoon the filling onto each crust.
Refrigerate the pies for 10‑15 minutes until set; top with a small dollop of whipped cream and a pinch of zest before serving.
Notes & Tips
- 1 If the filling is too runny, add a touch more whipped cream and chill a few minutes longer.
- 2 For extra zing, drizzle a thin line of lime curd over the whipped cream.
- 3 Store leftovers covered in the fridge; they stay fresh for up to 2 days.
Tools You'll Need
-
Mini tart pan or muffin liners
-
Mixing bowl
-
Hand whisk
-
Measuring cups and spoons
-
Spatula
-
Refrigerator
Must-Know Tips
- Don’t over‑mix the filling; keep it light.
- Press the crust firmly for a stable base.
- Taste the lime juice first; adjust sweetness if needed.
Professional Secrets
- Use chilled bowls for the whipped cream; it whips faster.
- Press the crust with the back of a spoon for even thickness.
- Add a splash of lime zest at the end for aroma boost.

Recipe by
Valentina MorettiChef Valentina Moretti developed her passion for baking while growing up near traditional European bakeries. She focuses on classic pastries like croi ...
Get Delicious Recipes Weekly
Join 25,000+ home cooks getting our best recipes straight to their inbox.
Free forever • No spam • Unsubscribe anytime